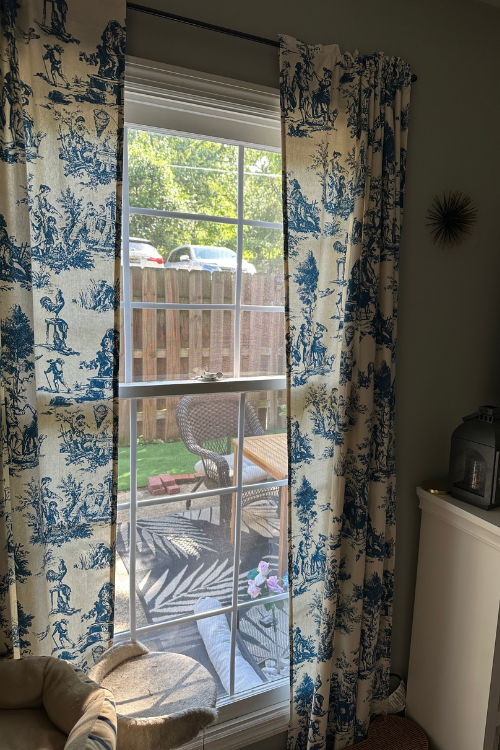
Transform Your Home With One Renter-Friendly Item
*This post may contain affiliate links that I receive a small commission from, at no cost to you. I only recommend products I genuinely love. Please see my full Disclosure policy for any questions. I always appreciate any support to keep this site running!
Thank you!*
Are you having the urge to transform your home but feeling restricted by what you’re allowed to do as a renter? You’re not alone! Renting can have its struggles and I know them all too well. I love a home makeover and have so many ideas tucked away for later when I become an owner, but until then, I’ve tackled some amazing projects that are renter friendly.
This one was one of the simplest makeovers I’ve ever done that had the most drastic effects and the best part, it won’t break the bank! I spent less than $100 and completed a window treatment that looks like professionally done French windows that would cost me thousands.
The Inspiration
I’ve always been a huge fan of French windows and one day when I am a home owner you best believe all of my windows are going to be dripping in French charm, but it’s gonna cost me. Seriously, I think a 48”x36” window with the trims all done and everything is like $750. Just one window! If I were to do an upgrade like that on my rental I’d be looking at like $4,500—and that doesn’t include installation. There isn’t a world that exists where I’d drop that kind of money on a place that wasn’t mine…but I want the charm. I want the gorgeous windows. I want to love every inch of my home and I want it now! So I’m impatient, sue me…or follow my lead and transform your home in under an hour without spending more than $100.
The Final Product
How stunning are these windows now that they don’t have boring blinds? The light that comes through them every morning is so calming and beautiful. My home has always felt like a welcoming place but now it’s completely transformed and feels more elegant at all times of the day.
I upgraded all five of my windows in under an hour for $65. Here’s how you can do it, too!
What You’ll Need
I had five windows I wanted to upgrade that were all the same size. The top portion was 24”l x 30”w and the bottom window was 35”l x 30”w. I was able to complete three and a half of them with a 66’ Window Grille Insert Kit and then used a 33’ Kit to finish the remaining one and a half windows. I only placed the grilles on the interior of my windows but if you’d like to do it on the outside as well, you’ll probably want to buy two of the 66’ Kits. I thought about doing both sides in case the sun wears down the grille’s ability to stick to the window but I’ve had them on my windows for over 6 months and haven’t had a single inch come loose.
TIPS:
~ Map out where you plan to put your grille inserts with the Blue Painter’s Tape beforehand. You’ll be able to decide which design you like the best and whether the lines are evenly placed.
~ Leave about an inch of Blue Painter’s Top on the wood trim of your window frame so that you’ll have an outline of the design you want to use even after removing the blue painter’s tape from the window pane
~ Clean your windows before placing grille inserts for the adhesives to work best
Window Treatment Styles
There are many different design options you can choose from to create your perfect window treatment. I love the classic Colonial style since it gives off that French vibe that goes so well with my decor. Play around with the blue painter’s tape and see which one you like best. Once you’ve settled on the one that makes you fall in love with your windows, let’s get those grilles on!
Now that you’ve decided on the design you want to use it’s time to place your grille inserts. Remove the blue painter’s tape from the window pane only. Leave about an inch of it on the window frame so you can line it up with your moulding trim’s placement.
Slowly place your trim on the window and cut the trim once you make it to the next part of your window’s frame. I don’t suggest pre-cutting the pieces you need. I did that for two pieces and could’ve sworn I cut them perfectly down to the centimeter but there was ever so slightly enough space between the frame and the insert that would’ve driven me nuts forever. Leave it on the roll and cut what you need as soon as you’re placing it on the window pane. This will give you a perfect cut that’s flush with your window frame.
Once you’ve placed the trim onto your window, apply pressure to each strip for about 30 seconds so the adhesive gets the best hold. Continue this process until all pieces are in place and you’ll be done in no time.
Within an hour you’ll have a completely transformed home just by giving your windows a simple upgrade. Plus, if you have fur babies like I do you’ll make them extremely happy with their new posts to stalk squirrels, birds and sometimes even you.
There you have it! A gorgeous upgrade to your home that’s renter-friendly, doesn’t cost a lot of money or time and makes you feel proud of yourself every time you walk through your rooms. Let me know if you have any questions and enjoy your next DIY night!


