
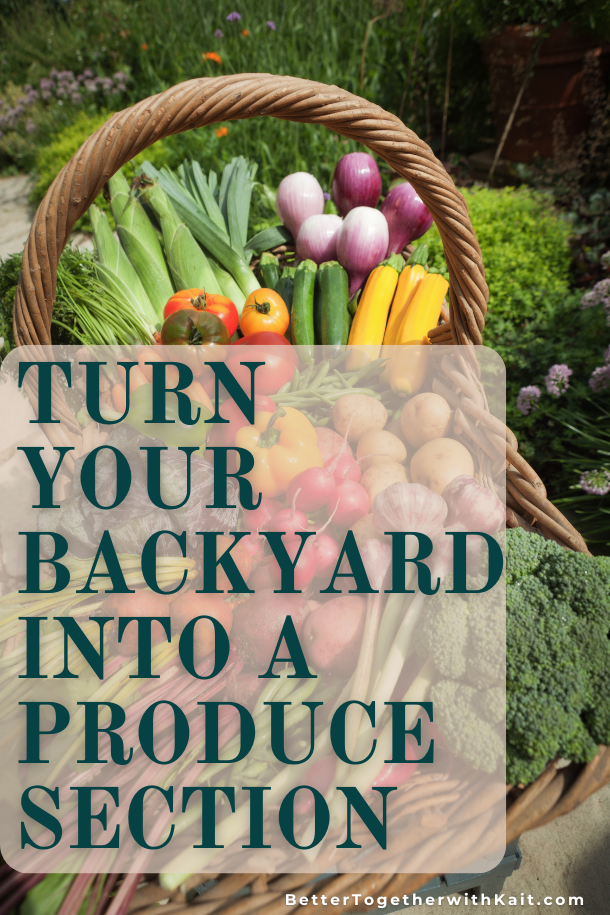
Turn Your Backyard Into a Produce Section—Even with the Smallest Space
Feeling the need to test out your green thumb but not sure where to start? Are you renting and only have a small balcony or a backyard you’re not trying to dig up and leave behind in a few years? Look no further! I’ve created the perfect produce section backyard in a small rental with containers and raised planters and I’m going to show you how to do it, too. This is my second year of successfully caring for my garden so if you’re new to being a plant mama, don’t worry, it’s easier than you may think.
Saying groceries are expensive nowadays is putting it extremely mildly so growing my own food is a fun project that’s also meant to save money. Heck, sometimes I can’t even get the produce I’m looking for because there’s less available or they don’t have the organic option (which I insist on). With just a few weeks of care, that problem is completely solved and I can step outside and grab what I want to make right then and there. Now, I did have to spend money on planters, containers, plants, and dirt, but I usually only have to buy these things once and then get the fruits of my labor (pun intended) for years to come with minimal refreshing.
Understanding Your Space
First things first, what kind of space do you have to work with? Even if you’re in an apartment with a small balcony, you can grow some great produce with a little creativity and choosing what you genuinely want to grow. I have a small yard at my condo so I do have space for more than most rentals would allow but it still took the proper design planning and understanding my sun exposure.
Sun Exposure
I’m very fortunate to live in a south facing condo and a north facing apartment before here so my home always offered the fullest of full sun exposure. If you’re in an east or west facing space don’t worry, you still have a decent amount of sun, just a few hours less than north and south. Take note of when the sun hits certain areas of your space for about three days so you’re absolutely sure about what exposure you usually get, rather than just going off an especially sunny day.
Here’s how much sun exposure you should expect from your garden or balcony space depending on location:
North Facing: least amount of sun in most places. I still got a lot in my old apartment but many homes shade your garden from direct sun exposure. Spring and Summer offer the most sun in these spaces during the afternoon so it’s still possible to grow your garden, but make sure you’re not overwatering as your plants will retain more of their water
South Facing: maximum sunlight exposure, usually 8-10 hours. Keep a closer eye on water levels since your plants can get dried out faster
East Facing: early morning sun followed by about 4-6 hours of full sun & a lower temperature than afternoon sun relieving plants of heat stress
West Facing: full sun around lunch time until sunset, usually 6+ hours and the higher heat of the day. Plants like tomatoes, peppers and potatoes will do well in this sun. Water more frequently here as well so they stay hydrated and happy.
Temperature & Hardiness Zone
Learn about the zone you live in so you can choose plants that will live all year long or know when you need to bring them inside. Most of my vegetables can’t live in temperatures under 32º F so they either need to be moved inside for the winter (not happening in my house)

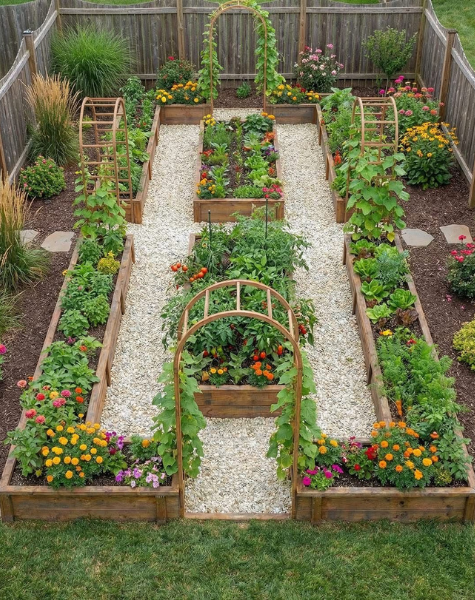
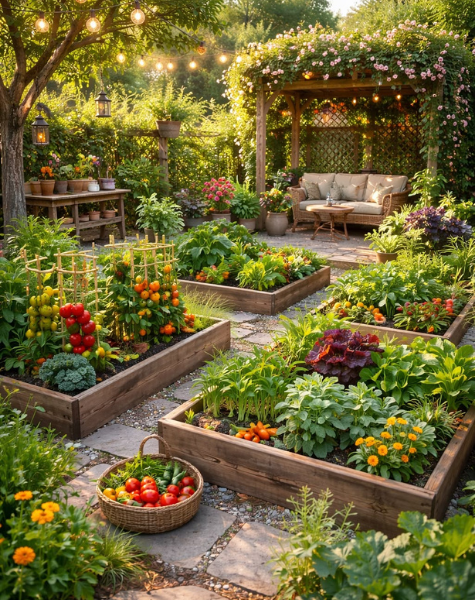
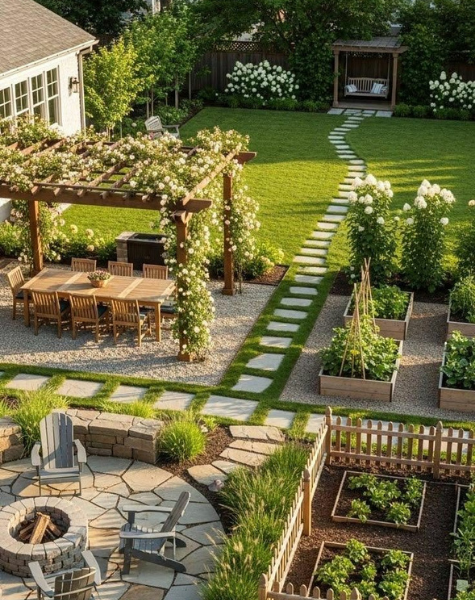
Garden Space Inspiration
You’re probably looking at an empty space and wondering what you’re supposed to do with it or having trouble envisioning a thriving garden. You may have a whole lot more usable space than you think. Here’s some great inspiration for your garden whether you have a small balcony, medium sized patio or full fledged backyard.
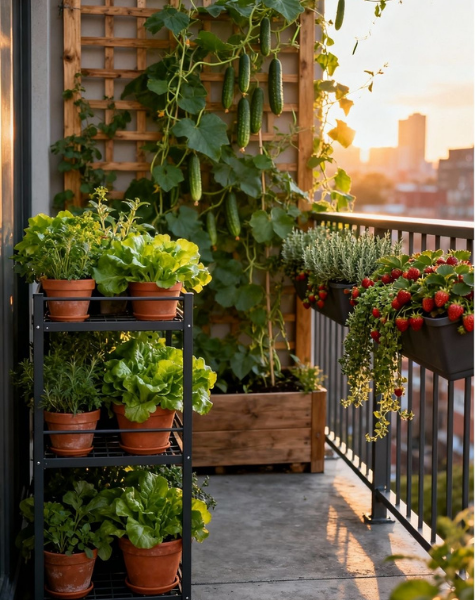
Vertical Balcony Garden
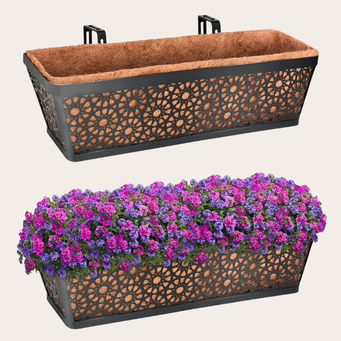
Don’t let that wall space go to waste. If you’re growing a climber like cucumber, squash or tomatoes let those babies climb. A planter with a trellis will be your best bet but you can always put them in their own pots and put up lattice for them to cling to. You balcony railing is also the perfect place to put herbs, strawberries, radishes, and plants that don’t need the vertical support. You can hang planter boxes and let your garden flourish. I like having two or three hanging planters in case some plants don’t grow well together and have different care requirements but if your plants can all go together my favorite is definitely the coco liner planter boxes for a more natural look.
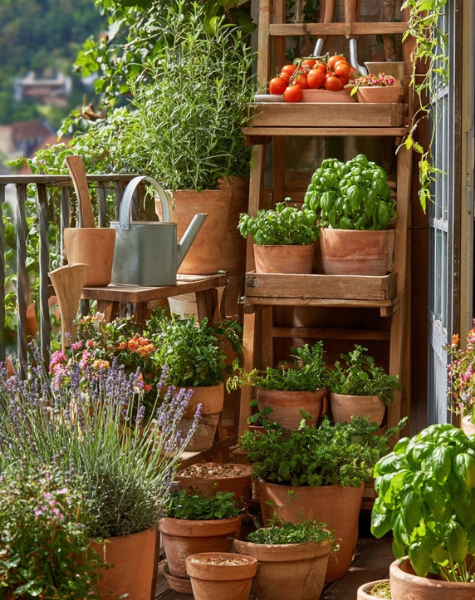
Small Patio Garden
This is the setup I have and there’s definitely more space to grow a lot of plants, even if you don’t have a lot of actual ground space to work with. Everything I have is in containers, raised planters or hanging from my fence so I can properly provide my garden with the soil and nutrients it needs. I know nothing about the dirt under my fake grass besides it’s friendly to nobody. The only thing I’ve seen survive in the ground soil is a Chinese privet and that’s just because they have the same will to live that a cockroach does. My garden is definitely not going in a hostile area like that.
Plan out your zones based on what you want to grow and whether your choices are companion plants (so many boost each other’s growth), what kind of sun exposure you have along with how you want your space to look. Aesthetics don’t always have to be at the cost of functionality in the plant world.
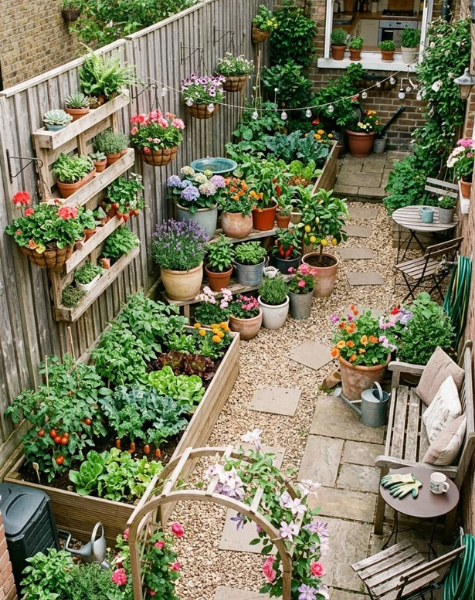
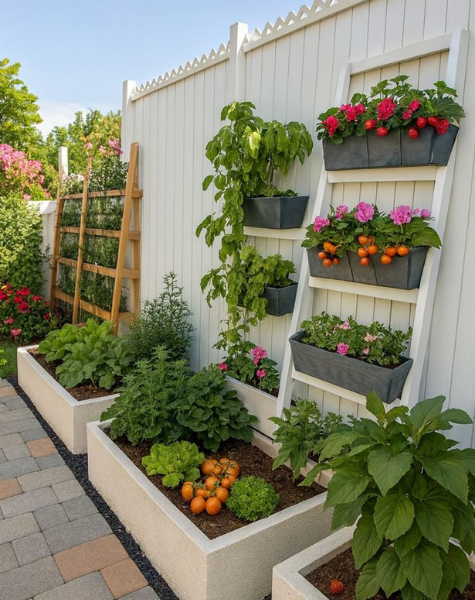
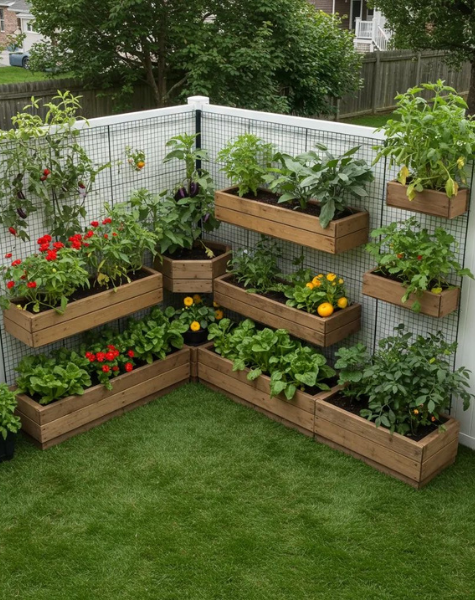
Big Backyard
My friend has a big backyard and I’m constantly sending her ideas! She has a small creek separating the back part of her yard from the front portion where she would park her car and sit out back closer to the house—allowing her to keep a lot of green space while also having a designated garden area. If you have a big space that doesn’t have much going on, add a walk-through garden with long running planters and tall trellises for your climbers or create stations for each plant and its companion you’d like to grow.
What You’ll Need
The Necessities
Gardening can become an expensive hobby but honestly, what isn’t these days? If you want to go all out and get absolutely everything you could possibly want, that’s great, but you can still have a successful garden with the bare necessities. We’re talking a place for your fruits & veggies to live, some potting mix, support rods, a soil tester and a little extra DIY with things you probably already have in your home.
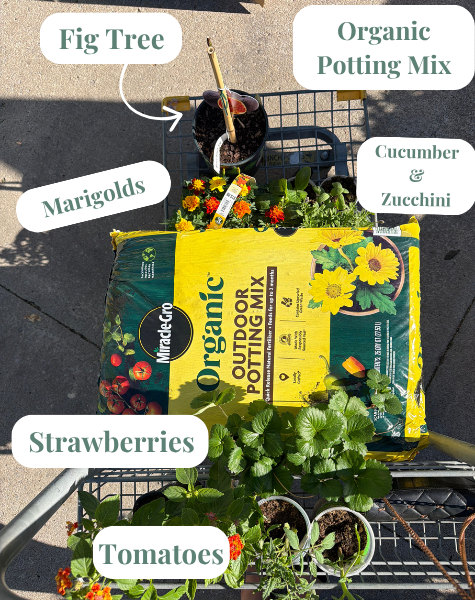
If you have a Costco membership you’re probably well aware of the amazing deals they have on gardening must-haves. Keep an eye on the sales and grab them while they’re here. The containers I used for my blueberries, blackberries, fig tree and strawberries is their 24” resin planter and it was only $15! You truly can’t beat that price. The peach tree is in their concrete planter that’s usually $50 but I grabbed it when it was $10 off. This year, Costco’s resin planter is $4 off 4/6-5/2 so be sure to snag one while you can.
If you’re new to planting or love keeping note of everything to stay super organized like I do, you’ll be so glad you downloaded a plant app! I’ve been using PictureThis Plant Identifier (available on Apple Store and GooglePlay) for about two years now for my indoor plants along with my garden and I’d be lost without it. I was able to figure out how to properly plant everything I’m growing, where it will do best, which plants were healthy before I took them home along with diagnosing how they’re doing as they grow. There’s a water and fertilize schedule that will notify you when a task needs to be done along with a notes section for every plant. Since I’m testing out whether certain soils or fertilizers make a difference in my plants this feature is keeping me from losing my mind. I highly suggest keeping track of your plants in an app like this one for their success!


Go the Extra Mile
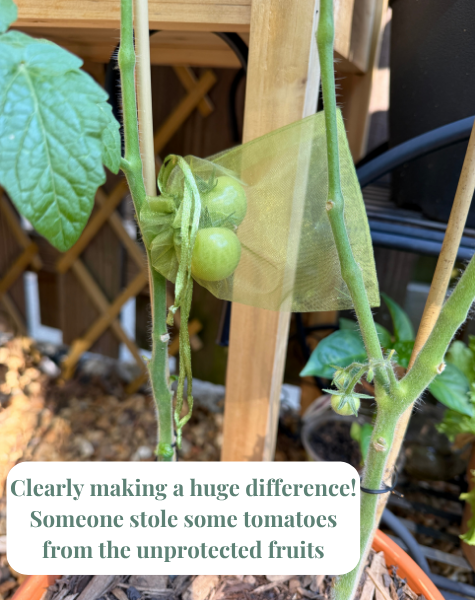
You don’t have to get all of these things but they certainly make your life easier. Last year I lost some peaches to a squirrel and I’m honestly still salty about it. Not this year! I have netting for the trees and bushes and I’m picking up a cover for my vegetable planter to keep out hungry critters that do not deserve my crops. I found this zip-front cover for plants that’s usually meant for the ground but it will fit perfectly on top of the raised planter bed for my veggies.
A great way to keep pests out of your plants is to plant nasturtiums around the borders of your planter bed or container. They attract almost every bug that wants to eat your fruits and veggies more than the actual produce does so you can distract them with these flowers plus create an aesthetic garden for you to enjoy. Once you see pests inside the nasturtiums remove the entire plant and add a new one. I keep the 12-pack nursery tray my marigolds were purchased in and plant nasturtiums in here. They sprout in about 7 days and can be moved to my planter and containers at that point. As soon as those are planted, I put new seeds in the empty nursery tray—egg cartons are also great options—so I’ve got new nasturtiums ready to plant when the trap does its job. This $10 bag of 350 seeds is more than plenty for my whole season!


Fertilizers seriously boost your garden but, similar to our food, not all plant food is made the same. I’ve made a big shift in what I eat and insist on organic so when feeding my garden—that will eventually feed me—I choose organic fertilizers with quality ingredients. For my peach tree I used this organic fruit tree fertilizer last year. Now that I’m expanding my garden, I want to get the proper fertilizers for each plant. This one from Espoma is what every top tier plant mama I know says is a must-have for strawberries, blackberries and blueberries. Since I’m also growing vegetables I’ve grabbed this organic vegetable garden fertilizer to keep them happily fed and thriving all season long. These fertilizers usually expire in about three or four years and, unless you’re growing a huge yard’s worth of produce, you will most certainly not go through the bags this year.
You can use an all purpose plant food if you’d like but understand that if it doesn’t specifically say it’s organic and OMRI listed, it’s most likely synthetic ingredients that can help your garden look like great, but your produce will be just as bad as the regular stuff you find on the shelves.
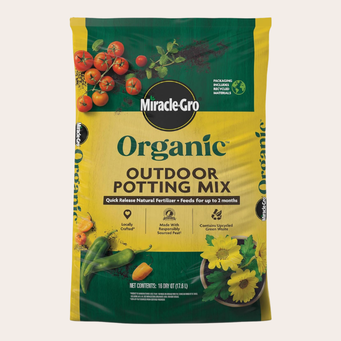
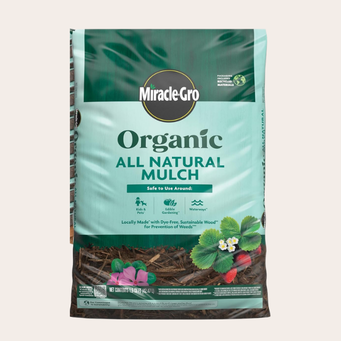
Mulching is an important step and many others say it’s an absolute must but I didn’t do it last year and nothing bad happened. If you’re planting in the ground rather than a raised planter I’m sure there will be more weeds and critters trying to get into your plants but for anything raised, I don’t see mulching as an absolute necessity. Last year I sprayed the rim of my peach tree’s container and my herb garden’s planter with this Cedar & Peppermint Oil Spray to get rid of ants, gnats and mosquitoes and it worked amazing! I am mulching this year for moisture retention, pest control and aesthetic purposes along with using the Cedar & Peppermint Oil Spray for extra protection. I used the Miracle-Gro Organic Natural Mulch and so far it’s been great. I’ve seen a few little ants trying to find a way to my plants without getting into the mulch before accepting defeat and retreating. The spray will lose its power with each rain so it’s nice to be protected at all times. You can find this mulch at almost every Lowe’s or Home Depot for about $4 a bag. Amazon only sells it by the palette, unfortunately. Be sure to get an organic mulch if your garden is also organic. You’d hate to ruin a perfectly natural garden with the last step.
Herbs
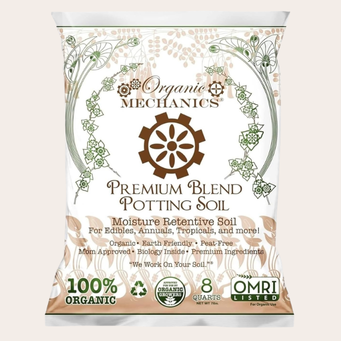
Last year’s herb garden was truly the best I ever had and I’m hoping to repeat the same results this year. The true game changer: the soil! I used Organic Mechanics instead of the Miracle-Gro in this planter. Miracle-Gro is still amazing and what I used for most of the fruits & veggies but after seeing that huge of a difference in the herbs with a soil designed specifically for them, I’m never going back. It’s a bit pricy (about $12 a bag at Whole Foods vs. $7 for Miracle-Gro) so I only used it for my herbs and for smaller pots.
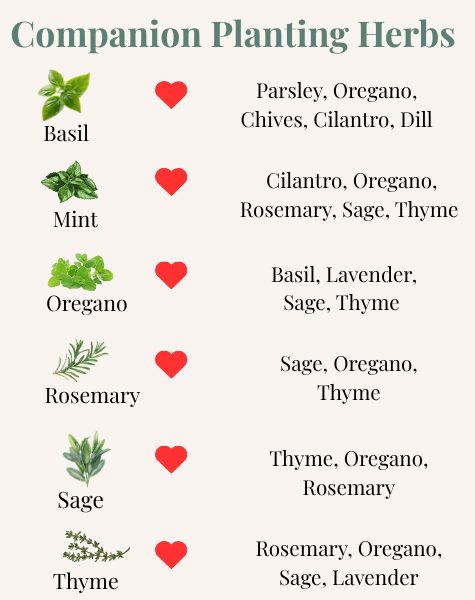
Companion planting is the theme in my garden and it truly should be in everyone’s. Playing well in the dirt is going to give you the very best harvest and the prettiest, too. No one wants to see a gorgeous plant in one corner while the others die around it.
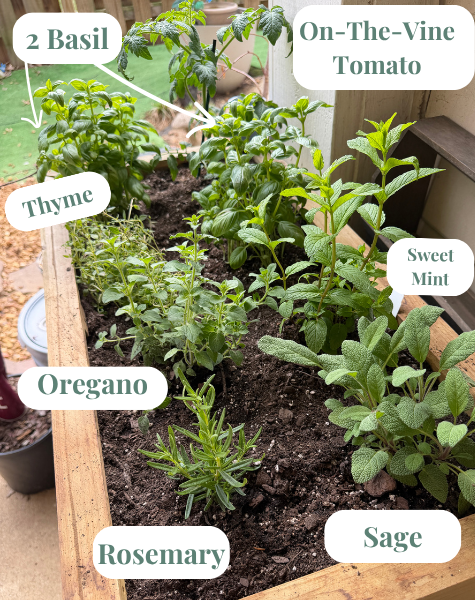
As you can see, there’s a tomato plant in this planter bed and there are two reasons behind this:
1.) Tomatoes LOVE basil and their flavor is enhanced by planting them together. Shouldn’t be a surprise since you see tomato basil sauce on almost every grocery shelf.
2.) I’m testing my theory about Organic Mechanics potting mix. Last year, Miracle-Gro did not disappoint in any way but if Organic Mechanics grows my tomatoes better than the vegetable raised planter does (which is filled with Miracle-Gro), I want to know about it.
Stay tuned and I’ll let you know if it makes that big of a difference. Now, time for the herb garden tips.
I put a lot of thought into my herb garden’s design so everyone grew well. I started with the corner where my tomato plant is so it had the most sun, space to grow over the side rather than crowding two herbs along with the wall post to use for support when it grows taller.
Basil grows extremely well with tomatoes and boosts the tomato plant’s flavor along with deterring pests so I made sure to plant them next to one another. I’m obsessed with basil and use it A LOT so I did get two plants—one on each side of the tomato plant and plenty basil for me to enjoy all season long.
Thyme is next to my front basil plant and technically, they say not to plant them together because in a container but they can coexist in a larger planter if they’re given the proper care. Basil is a very thirsty herb, whereas thyme can easily get root rot from overwatering. I planted the basil plants about an inch lower than my thyme so the water would naturally flow away from the thyme. I also make sure to check the thyme’s soil area often so it doesn’t get overwatered.
Oregano, Rosemary, and Sage are wonderful companions and naturally grow around one another in the Mediterranean where they originate from so I put them on the other end of the planter together.
Mint is often advised to be planted in its own pot since it’s basically a weed that can easily take over. I keep a close eye on my entire garden so anytime I see a runner trying to move in on a neighbor I snip it and plant it somewhere else in the garden. Why buy multiple mint plants when you can get a bunch from one that’s determined to multiply?
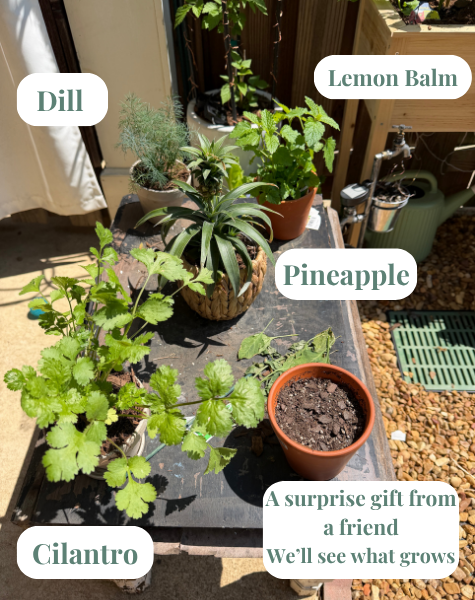
My herb table was a last minute make shift design because I needed more space for other herbs and the cutest pineapple I just couldn’t leave at Trader Joe’s. The table was a free side of the road grab that has a great base but horrible top—which I will absolutely be changing out. For the time being, it’s the perfect home for my dill, cilantro, lemon balm, pineapple and a surprise “plant me” gift from a friend. When the wind blows it hits all of these fragrant herbs perfectly and annoys pests that want to eat my veggies. I call this my super smelly table and I thing it does the heaviest lifting of my entire garden.
Fruits
Yay! Time to get to the fruits! Last year’s peaches and blueberries made me so proud and tasted better than any fruit I’ve ever purchased so I couldn’t wait for the chance to expand my fruit garden this year. I will say I went a little overboard (go figure ha!) but I’m in love with every single fruit plant and have no regrets!
Remember our theme of the garden? Companionship! As you may have guessed, companion planting isn’t just for herbs. Fruits, veggies, even flowers have friends in the plant world. Let’s take a look around my garden to see how I planted everyone for the most successful harvest.
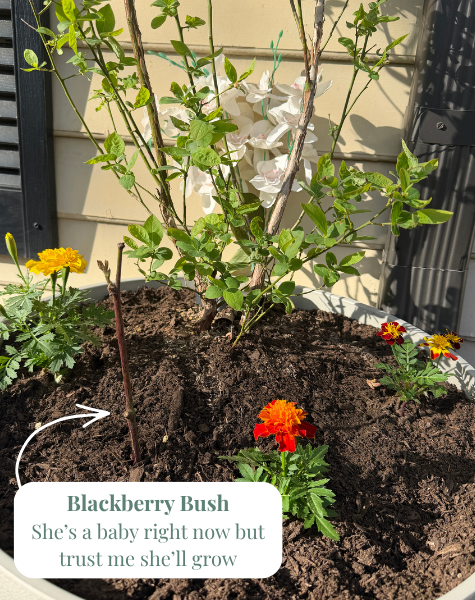
Blackberries & Blueberries
These two thrive off the same soil without getting in each other’s way. They prefer a more acidic environment and this can be easily achieved and for FREE! If you’re a coffee drinker, DO NOT throw away your used coffee grounds. Collect them in a bag or a compost bin and add them into your potting mix to bring the acidity level down and your berry bushes up!
Each of my planters needed about 2 bags of soil to fill them all the way but since I wanted a more acidic environment for the berries, I needed to work the coffee grounds into the soil. I got a bag from Starbucks around 2pm so they would have plenty of used coffee grounds to send me home with, grabbed my soil tester and started mixing them into my blueberry & blackberry plants’ soil bag.
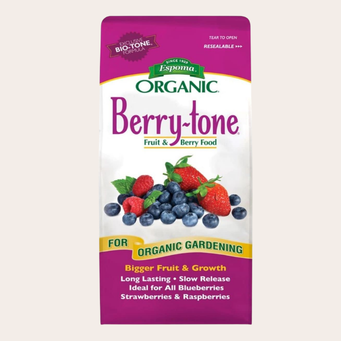
When adding coffee grounds to your container, fill 2/3 of the container with your soil and the rest with the used coffee grounds. Start mixing it up with your hands so that everything is evenly distributed. Once it’s all mixed together, you’re ready to plant your blueberry and blackberry bush. If you’d like, you can add coffee to your plant throughout the growing season but I prefer to use the Espoma Berry-Tone fertilizer so the plant gets even more nutrients. The coffee grounds get my plant started off strong, but the fertilizer helps her thrive. I wait about a month after planting the bush before adding fertilizer then give it another round of fertilizer about 6 weeks later. This fertilizer is also what I use on the blackberry bush in the same container and on my strawberries.
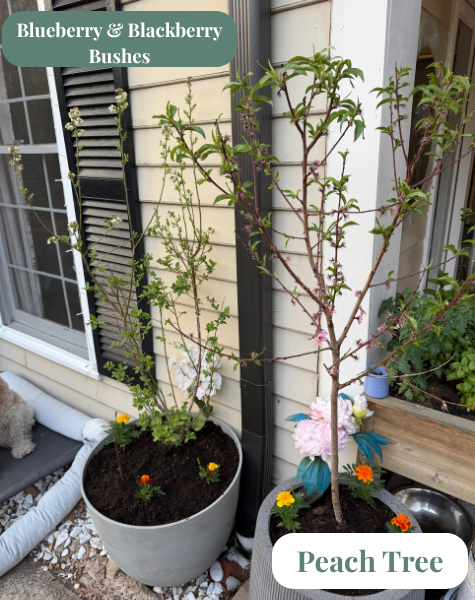
Peach Tree
Oh, the excitement I have for my peach tree this year! I got 5 from her last year (the squirrels got 2 and yes I’m still mad at them). Now, only 8 peaches may sound like a ridiculous waste of resources but remember, being a plant mama is about quality and patience. She’s only about 4 years old and just getting her start in life so with each year, she will grow and produce more. I’m hoping to get 10 this year but she may surprise me with more—especially with the proper fertilizing schedule and protection from the pesky fur thieves.
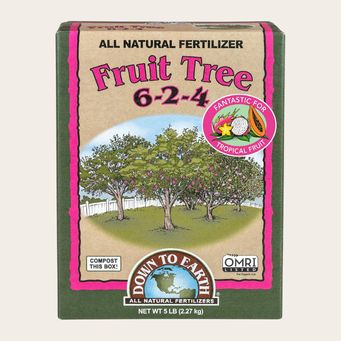
As you can see, there’s quite a few peaches already growing—many of which do fall off so the strongest can become the juiciest peaches. I’m expecting quite a few this year based off of what I’m seeing so far but fertilizer will certainly help my tree grow as many as possible. I’m fertilizing it this week since there are buds breaking and then I’ll do another round in June. I have leftover fertilizer from last year (Down to Earth Fruit Tree) that worked very well but another great brand is Espoma’s Organic Tree-Tone. After the fertilizing in June, your tree should be strong enough to make it through winter and look forward to next year’s harvest.

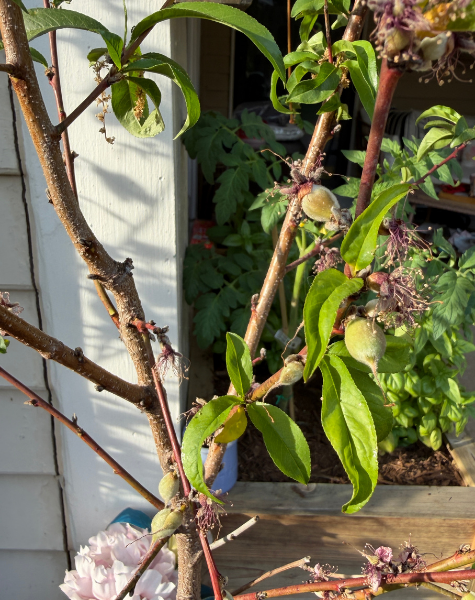
Fig Tree & Strawberries
Another addition to the garden I hadn’t planned on: my fig tree! I was grabbing soil from Lowe’s and one thing turned into another—as it always does when I’m shopping—and now I’m a fig tree mama. Watching this grow has been one of my favorite things to see and I’m truly amazed how quickly they grow. I wasn’t exactly sure what to put in this location but I knew it needed to be something that preferred morning sun with a solid break by 1-2pm and a little more sun from 4-6pm and also wouldn’t grow super tall into my window. Apparently, Mother Nature knew I needed to tend to one of her fig trees because that describes their preference to a T!
Figs and strawberries are two plants that compliment each other very well so it was a no-brainer to put them together. I’ve got plenty of daughter plants from my strawberry basket’s runners that need a place with full sun but not enough to scorch them so I planted them in front of the fig tree. Strawberries have shallower roots so they can act as a mulch barrier for fig trees without disturbing the fig’s roots.
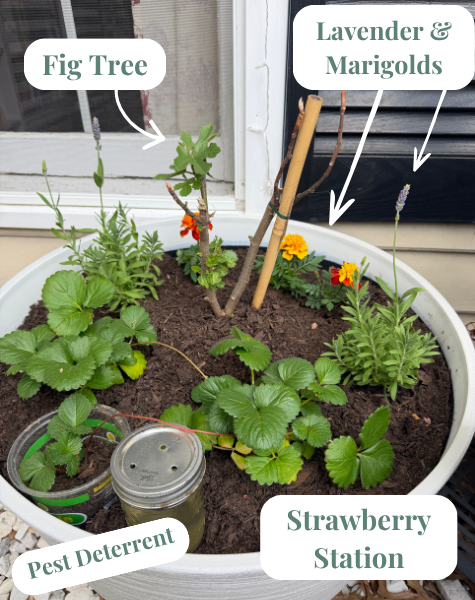
I added some lavender and marigolds to deter pests along with a DIY mixture of water, apple cider vinegar and dish soap to trap any bugs who get too close to my fruit
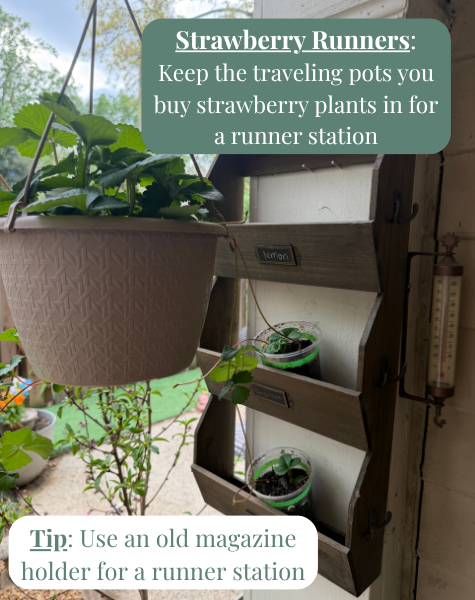
Strawberry Station
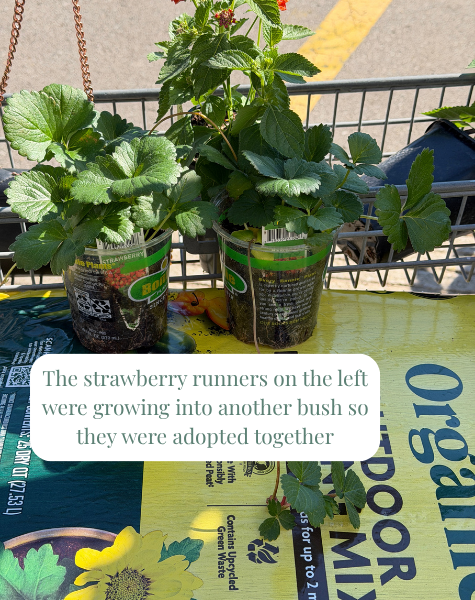
So you may be asking “what is with all the strawberries??” Well, I’m obsessed with them so having a bunch of plants for consistent strawberry access is definitely a personal preference but also, they grow like weeds when they’re happy! I bought this basket and two small strawberry plants that were already growing into one another, but after all the runners are planted and clipped from the mother plant, I will have 13 strawberry plants! I’m telling you, they grow like weeds. Keep that in mind when buying one.
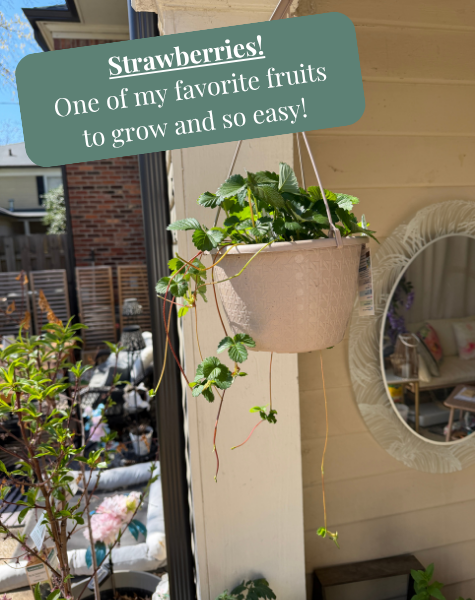
I always keep nursery pots in case I want to reuse them later on and my strawberries are definitely taking over most of them this year! The larger mother plant had about 10 runners hanging from the basket and I’m slowly planting the ones with the most potential for a few reasons.
Obviously, I want more strawberry plants. As soon as the planted runners take hold and start growing their own white roots in the nursery pots, I can cut the umbilical cord from the mother plant and the runner will become a daughter. Aside from just wanting more plants, I want a lot of fruit and the mother plant can’t focus on growing anything for me to enjoy when she’s focused on making her own babies. The quicker you can either plant these runners or snip them all together, the quicker you’ll see fruit producing.
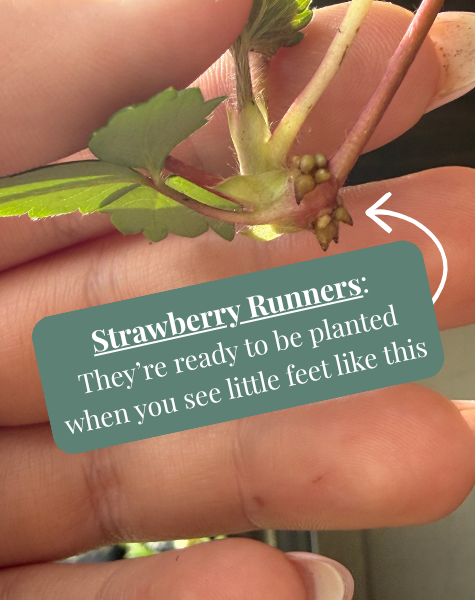
I’ve always read that the runners need 2-3 weeks of growing time before being trimmed from the mother, however I cut the umbilical cord 8 days after planting and my daughter plants are doing amazing! Just make sure that when you give the runner a little tug, you see the soil in the nursery pot moving with it. This will ensure that your runner has grown roots and is ready to be on its own.
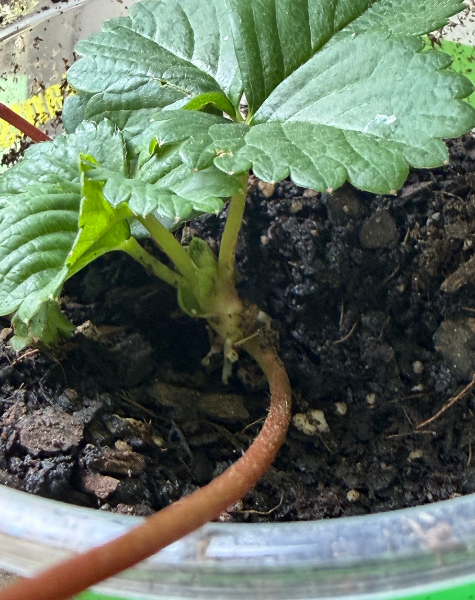
If you don’t have a nursery pot or a hanging wall mount for these pots you can always fill a small snack sized zip-loc bag with soil, place your runner into the soil and zip it up with the runner’s umbilical in the middle. Let it grow hanging on the mother plant like this and once you see white roots about 4” long, you can cut the umbilical and grow the daughter plant in her own pot.
I only planted two runners at a time (again, so mama plant could properly direct her focus) and once they were ready to be cut, I planted two new runners so my strawberry plant is evenly focusing on her own growth, runner growth, and lightening her load little by little each week. I also feel like my runners are growing stronger roots quicker this way. Botanists could come for me and say I’m completely wrong but based on what I’ve seen this season, the runners and mama plant are responding extremely well to gradual growth versus over-growing them.
Pineapples
I honestly wasn’t going to grow these since they’ll die in the winter if they’re not brought inside, but how stinking cute is this pineapple plant?! I saw it at Trader Joe’s (do not sleep on the TJ’s plants—prices truly can’t be beat) and decided she just had to come home with me. I’ve never grown bromeliads but my mother is obsessed with them so I’m getting some extra compliments from her on my garden.
When checking the health of a bromeliad look underneath the crown. If you see smaller crowns coming up (also known as pups) you know she’s a healthy plant. These pups will actually start sprouting out throughout the season and become new pineapple plants. Once they’re about 1/3 to ½ the size of the mother plant you can easily twist and pull them off (if they don’t come off easy, they’re not ready), remove the lower leaves off the separated pup to expose the base, plant it in soil and a sunny spot and voila: you’ve got a new pineapple plant growing.
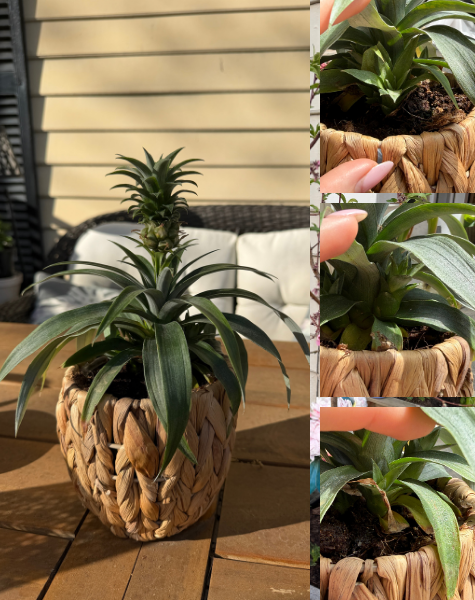
When I first brought home this pineapple plant it had four pups growing underneath. Now there’s six! Always check for happy pups to know if you have a happy mother pineapple.
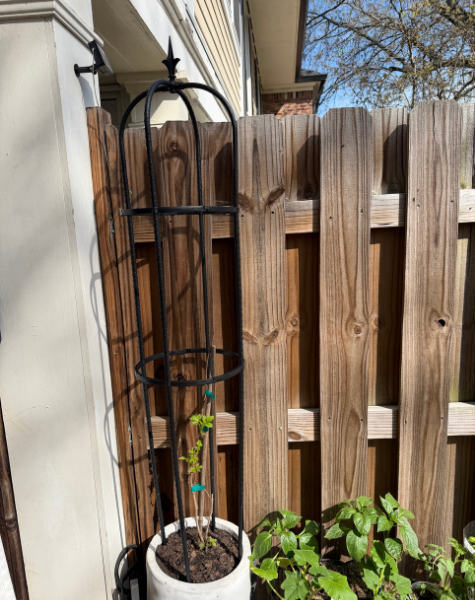
Raspberry Bush
I had my blueberry bush in this pot last year but had to switch things up when I added the raspberry bush because she’s not exactly friendly with others. As I mentioned before, the blueberry bush and blackberry bush thrive together so I moved them into a container together. Raspberries, however, like being alone unless the other plant has something to offer it like pest repellent, attracting pollinators or ground cover…none of which a blueberry or blackberry bush would bring to the table.
Veggies
You know you’re an official plant mama when the veggies come into play. This is my first time adding them into the mix but—not to toot my own horn too loud—I’m already so impressed with their turnout. I was noticing little baby squash forming before I even got them into their forever home. The pride I felt was so immense I thought I annoyed my friends with all my “look at my plant babies” texts but they instantly asked how I got them to grow. Now I’m sharing all the growth with everyone. Gatekeeping is not approved here—unless it relates to bunnies who think they can steal my veggies.
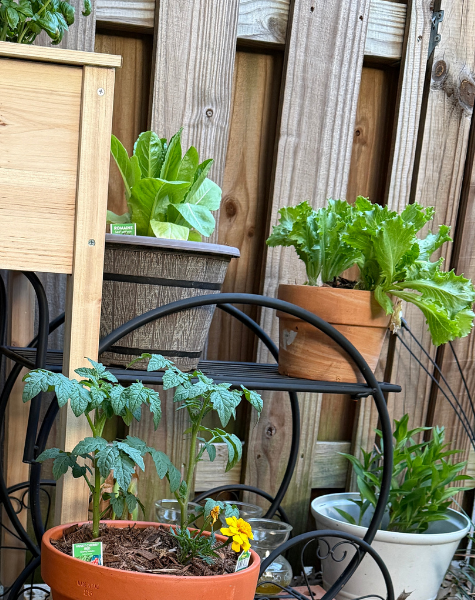
Certain veggies work really well together while others can take over or have different needs. I crafted my planter bed to be one they’re all happy to live in and put another group of leafy greens in pots on my garden cart a few feet away.
Squash, Tomatoes & Cucumber
Don’t be intimidated by the squash and tomatoes. I heard horror stories from so many people about tomatoes in particular but with the proper love and care they’re an extremely rewarding treat to grow!
Planning out the location of each is going to make all the difference for your garden’s success.
Squash, zucchini and cucumber all grow vertically so I made sure to put them in the back of my raised planter with trellis netting and 4’ tall bamboo posts for support. The netting will train them to grow up and you’ll notice little tendrils starting to grab hold of it. I’ve also provided 18” bamboo posts for my bell peppers and tomatoes to support them, as well. They will eventually grow taller and need the 4’ posts but for now, we’re only using what we actually need.
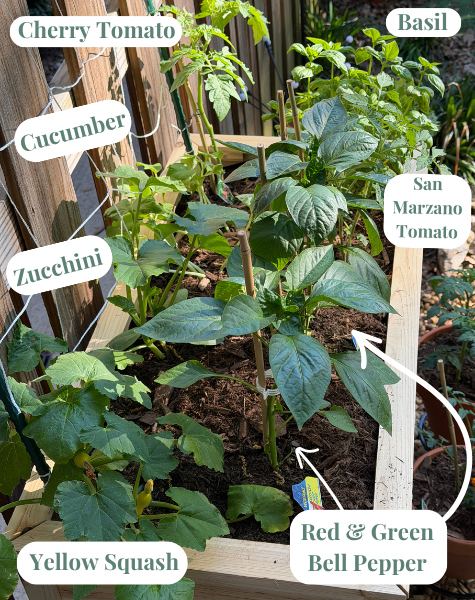
TIP: Prune Your Tomatoes!!
As soon as you see flowers coming through (which will soon become your tomato) prune all the stems underneath to encourage the plant to grow your fruit. If you don’t prune your tomatoes, your yield will be significantly impacted. If you’re doing it right, your tomato plant should look like a bushel of 4-6 tomatoes with a completely bare stem holding them up with the support of a bamboo rod.
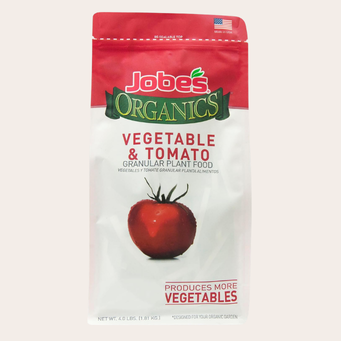
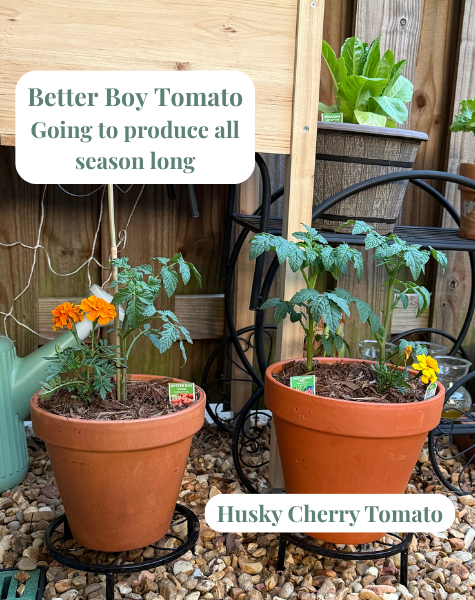
Once your tomatoes are ready to be harvested, remove them and your plant will be encouraged to start making some more. I used Espoma’s Garden-Tone organic fertilizer last year for my herbs but it’s apparently great for tomatoes. I’m testing out a few different systems though (you’re welcome because now you won’t have to) to see if that fertilizer is really the best. I’ll be using it on my tomato plant in the herb garden planter and these two tomato plants in pots. As for the tomatoes and vegetables in the raised vegetable planter, I’m using Jobe’s Organics Granular Garden Fertilizer for Vegetables and Tomato Plants. Come the end of the season, we’ll know which soil (also Organic Mechanics in the terracotta pot tomato plants) and fertilizer really gives the best harvest.
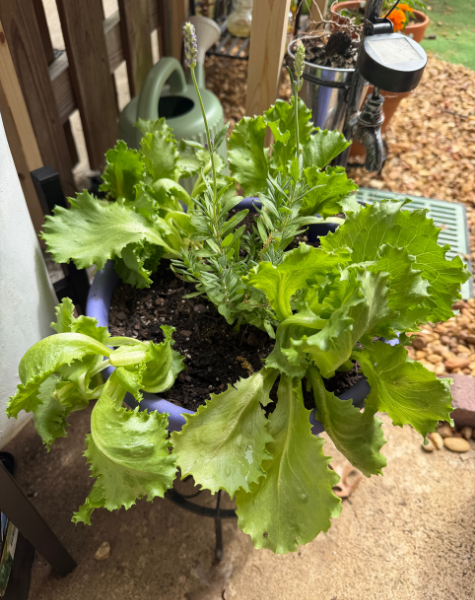
Leafy Greens
Welcome to the salad bar! This is another piece of proof that growing your garden is an addiction because I had no plan to add them but decided last minute…why not?! One of my favorite lunches is my chicken salad on sourdough with a crisp slice of lettuce. Now I can step outside and trim off the freshest piece of lettuce I could ever find.
Trimming a piece of lettuce without completely cutting it from the base will actually encourage your plant to regrow that piece, allowing you to have fresh & crisp lettuce all season long with the cut & return method. Lettuce is more of a partial sun fan so this being the only place I really have left in the garden was perfect! The raised planter blocks a good portion of sun during the middle of the day and my fence blocks the lettuce on the cart, ensuring they only get between 4-5 hours of sun.
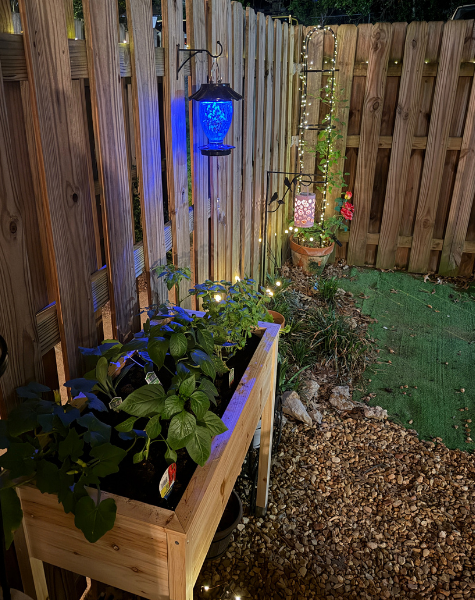
Add Some Light
I love adding solar lights to my yard for a whimsical & enchanting feeling so naturally, I had to add some more to my vegetable station and raspberry bush. I love hummingbirds in the yard and they’re honestly the only bird that will help pollinate my fruits and veggies without trying to take one for themselves so a solar hummingbird feeder was a great addition to the fence.
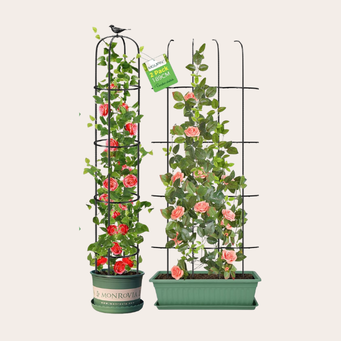
I wanted a trellis for my raspberry bush since they grow pretty tall and need support. Thankfully, I had purchased a 2-pack of the obelisk trellis my clematis lives in so I was able to make my cornerstones match perfectly. All I needed was two strings of fairy lights to line the dome with and it would be prefect!
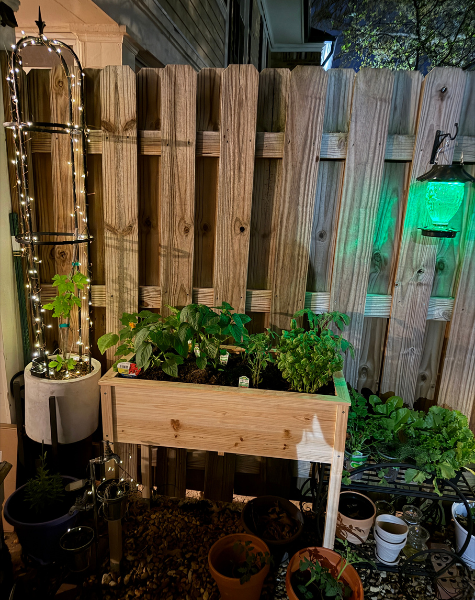
Enjoying my hard work in a few weeks is going to be such a satisfying feeling but until then, sitting in my garden has never been more relaxing. I have my morning coffee out here, enjoy lunch with a few snippets of my herbs and lettuce added onto my sandwich, entertain friends with wine inside a magical fairy garden, even write this blog post on my patio table. Starting a garden may take some work and a little bit of money to get started, but as of April 4th, it’s already been the most rewarding three weeks…and I haven’t even gotten my produce yet!
If you can put together a little garden for yourself, do not hesitate! You will absolutely love seeing all of your hard work come to fruition, find a new level of value and gratitude for the food so readily available to you in the store and hone a new craft for yourself.
Have you started your own garden? Tell me all about it in the comments!
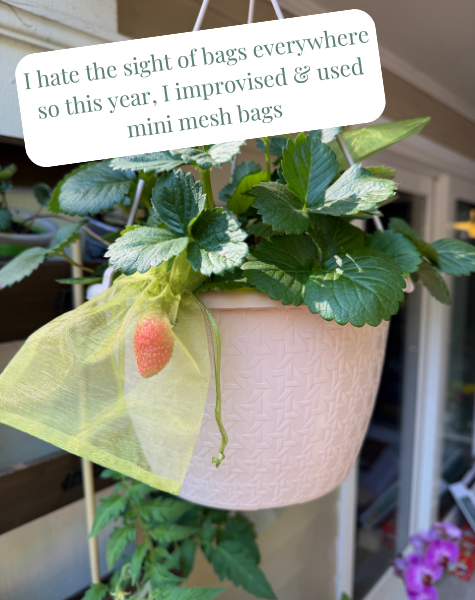
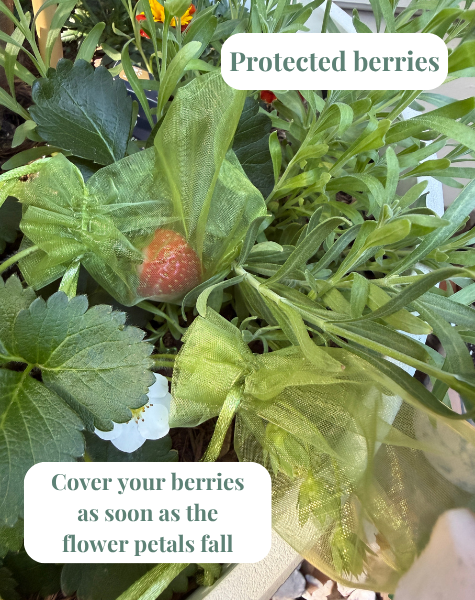
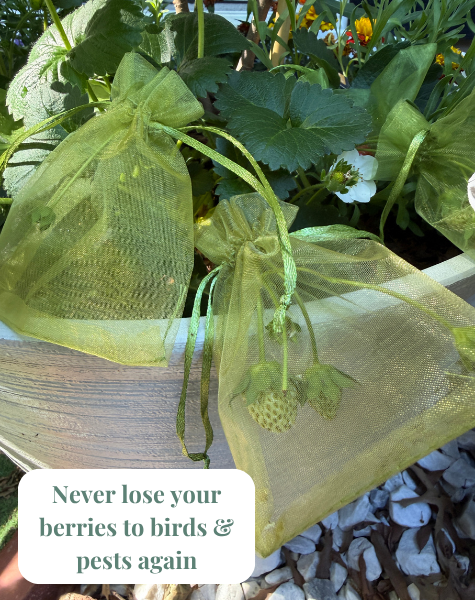
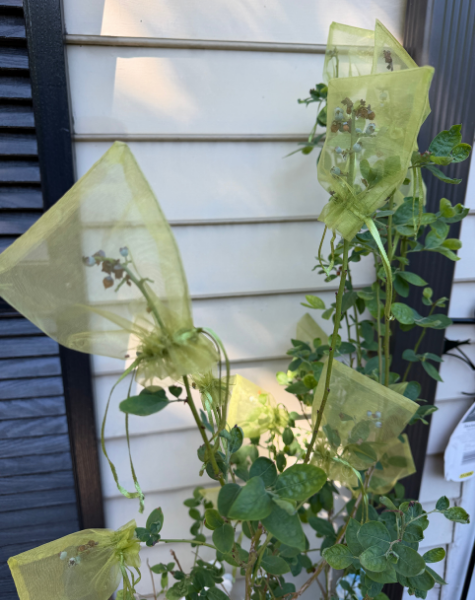
Protection
Now that you’ve set your plant babies on the right path, make sure you’re ready to protect them from the pests that want to steal all your hard work. Unfortunately, doing this can look terrible and cheap with bags everywhere. I’m all for a mesh tree bag or two but when you’ve got over 20 different fruits and veggies growing, your yard suddenly starts looking like a Dollar General themed kid’s birthday party. No thank you!
This year, I decided to test out a little protection idea that blended in with my plants without sacrificing the level of protection I’d achieved in years past. Then it hit me: green mini mesh bags!